Last week, I broached the subject of the perfect risotto, and the basic things one has to know before making one. Since partial knowledge is no use to anyone, it’s time to pick the subject back up.
We already know the very basics – that we need bouillon, and risotto rice, and good cheese. But what is the process itself like?
How to (actually) make perfect risotto
The process of making risotto is simply explained, but takes a long time to actually perform. Brief, here’s how you go about it:
- Heat up olive oil and lightly sear the onion.
- Add rice and fry together for 3-5 minutes.
- Pour some wine onto the hot rice, wait till it evaporates.
- Add the main ingredient of your risotto (spinach if you’re making it with spinach, mushrooms if with mushrooms etc.), stir fry for 3-5 minutes.
- Start adding bouillon in small portions. Stir each portion in and wait till it evaporates before adding the next portion. Repeat this step till you have a milky-white rice-pudding-y mass, but with rice grains still visible.
- Add the auxiliary ingredient if applicable (walnuts for spinach and walnuts risotto, for instance). Mix in, possibly add the last portion of bouillon.
- Turn off the heat. Mix in a solid portion of grated Parmesan. Serve immediately.
Now, this seems simple enough, but there are some snags in the process that can really mess things up for you. Luckily, I’m here to help!
Most common problems with risotto:
The Cookpot
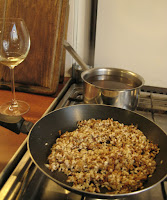
The first hurdle you may hit is your choice of the pot, or pan. And the problem with your choice will not be immediately apparent, either, so it’s good to be forewarned. As you cook it, the rice will expand significantly, meaning that you need to have quite a lot of room ready for it in your pan. But you will also be waiting for bouillon to evaporate (repeatedly) so you need a large surface, too. Therefore, in traditional Italian restaurants, they make risotto in pots such as the one pictured above, which can fit in the expanding rice.
The pot also has to have a nonstick surface because at the end, with the cheese, you’ll have quite a burn-prone adhesive in there.
The pot also has to have a nonstick surface because at the end, with the cheese, you’ll have quite a burn-prone adhesive in there.
The Bouillon
There are people out there who will tell you you can just pour it all in and cover the pot and wait for the rice to absorb it. That you don’t have to mess about adding it ladle by ladle and spend an hour gazing at it. Unfortunately, that’s not true.
 |
| Front - rice and chanterelles Back - hot risotto stock |
The Salt
While risotto likes a nice dose of salt, it’s horrible when oversalted, and easy to oversalt, too. Salt in risotto is best added through the bouillon, which ensures it’s dissolved evenly. Even during cooking, if you want to add some salt, add it to the stock. However, always remember that you’ll be adding a strong, salty cheese in the end, and therefore it can and even should taste a bit undersalted before that. I’ve ruined my work twice forgetting this.
Okay, that’s quite enough for one evening! (I did say I’ve done research into this.) The next part will be some good combinations for risotto, as well as last-minute tips.
(* …toil and trouble…)


Spot on with this write-up, I absolutely believe that this site needs a great deal more
ReplyDeleteattention. I'll probbly be back again to see more, thanks for the info!